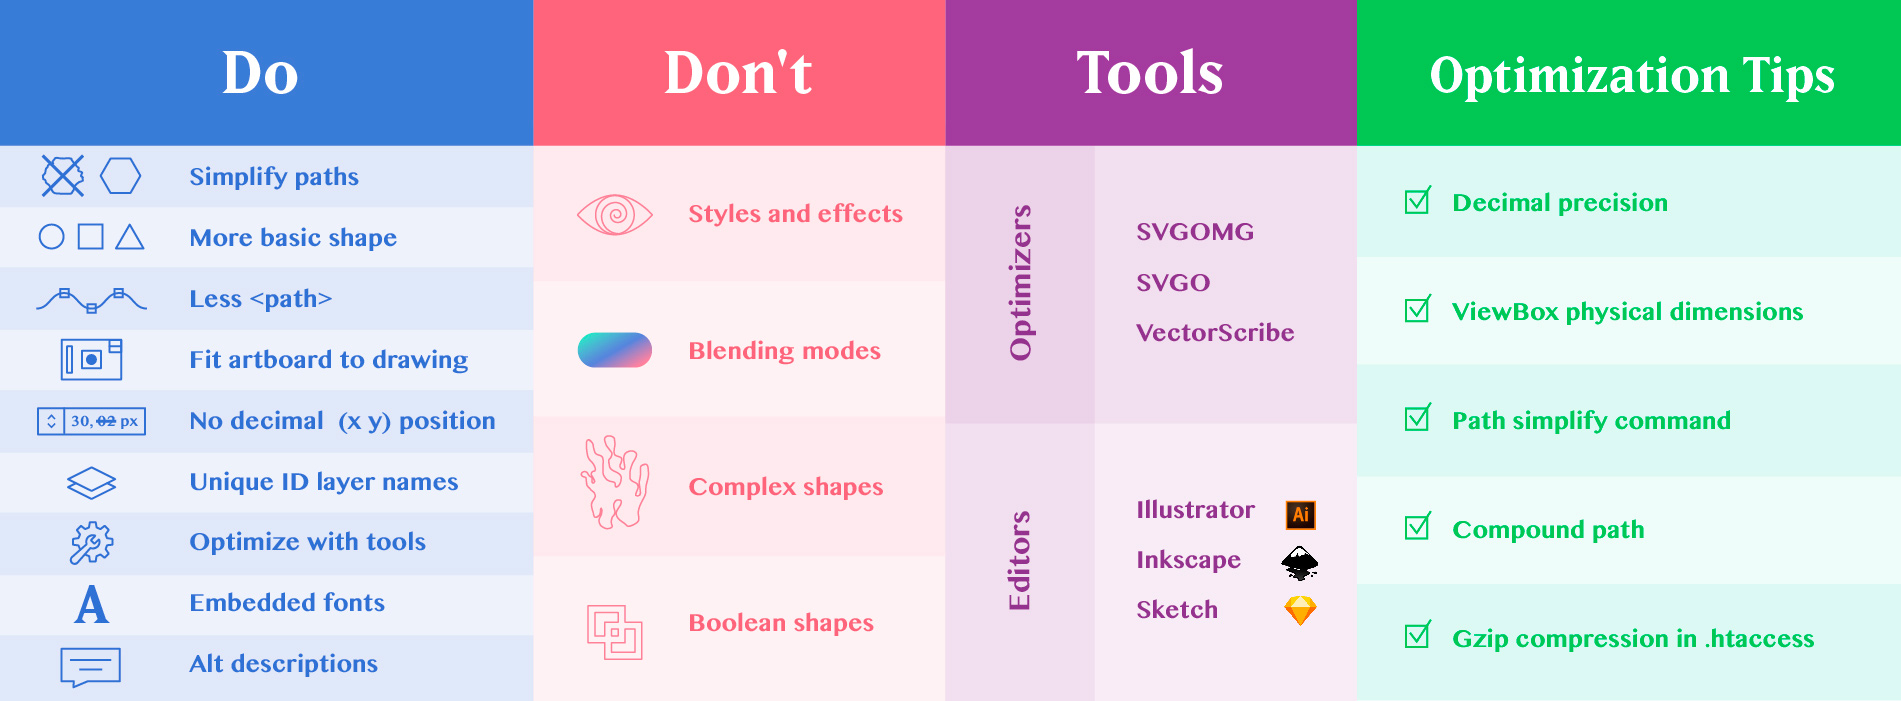
Introduction
Scalable Vector Graphics (SVG) is an XML-based vector image format for graphics that supports animation and interactivity. It is supported by all the major modern web browsers, can be compressed and is scalable and device agnostic. It looks great on any device that supports it. Another added benefit for designers is that every modern design tool can handle it, both in reading and writing.
SVG matters to designers because it allows us to stay away from heavy graphic files and resolution hurdles. Regardless of the screen it is rendered on, an SVG will remain crisp and clean, with a shorter page loading time than a PNG or JPG. It is an ideal scenario in many aspects, but it does not have the most straightforward exporting process.
Since an SVG file is text based, it is likely that the editor you are using to export the file does not output the cleanest or most perfect code. Unlike raster images, the code is a description of the graphic that you have designed, translated into a human-readable text file, so its size does not depend on the file’s resolution. It contains a description of its shapes, gradients, layers, effects, masks, and so forth. Because of these idiosyncrasies, the way you build your graphic will condition the code.
Unfortunately, that’s the main drawback of SVG. There’s no two-click “Save as…” workflow where the output is always what we want. Chances are you’ll find yourself doing some tweaking in order to use those graphics in the way you intended.
Designers are getting increasingly familiar with coding, but even if you are not, don’t be intimidated by this. Anybody with a basic knowledge of HTML is capable of tweaking their SVG exports. This article shows tips you can use when working with these files.
The way we build our graphics
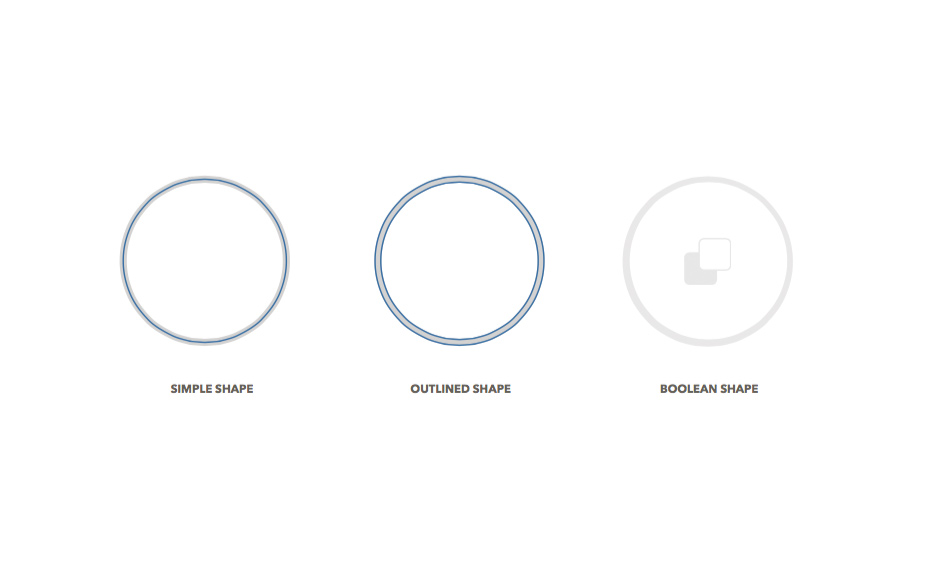
In whatever editor you use, there are multiple ways you can create a shape that looks exactly the same. Take a circle, for example. You can create an oval with equal width and height, a determined stroke thickness and a color for that stroke. You can also have the same shape converted to outlines or even the result of a boolean operation between two ovals with different sizes.
Even though these 3 shapes look identical to the eye, their SVG exports will not be the same. The editor you use will translate the shapes to code and since the three shapes have been designed differently, the code for the three will differ.
Layer nomenclature
Having a solid layer nomenclature goes a long way. Most editors will retain the layer names you are using, using them as IDs in the SVG code. This can be the door to many conflicts. For example, if you are trying to export a few SVG assets from your design, and these assets share the same layer name – ‘Oval’ –, the editor will then output code where the id of those items is “oval”. In HTML, every id must be unique, or we will be facing undefined and erratic behavior, such as incorrect rendering or even shapes getting combined.
Having a solid layer structure is not only a great way of approaching our designs, it will also save us time as soon as we start exporting those assets.
Styles and Effects
In a similar fashion, there are several ways to achieve the same results when using layer styles and effects. A good rule of thumb to follow is to always keep things as simple as possible since that will be the best way to resolve any issues. That also accounts for blending modes.
If you can’t avoid using blending modes in your graphic, always load the exported file in a few browsers and see how it’s being rendered. If the actual results are unusable, you will probably need to find a workaround.
Illustrator, for example, includes SVG filters. Working with these filters will produce a much better output. If you were to use regular Photoshop filters, the export will not be vectorial but a raster of the effect which will get embedded in your SVG file. This defeats the purpose of this process since we would be creating a much heavier file.
Of course, it all depends on the intended usage of your graphic, so again there’s no straightforward one-size-fits-all way to approach this. As soon as you get more familiar with how your design approach affects the code output, you will feel your workflow improving drastically.
Text & Custom fonts
Custom fonts are supported in SVG files, but that doesn’t mean you should abuse them. Since they work the same way they do when you’re designing a website, loading custom fonts will cause an impact on the website's loading time.
Word
For example, if you’re planning on using Avenir on both your website and your graphic, there shouldn’t be any major issues. But loading an extra font just for the sake of a logo that has been exported in SVG is counterproductive.
In these cases, the best way to go is to produce outlines out of the letterforms, although lighter weights will most likely need a bit of tweaking, because the outlining may not be perfect. Whenever we find the right balance, that element will remain true to its design without impacting the load time.
There are some caveats: since the text will be converted to shape, it will become not accessible or ‘readable’ by a search engine. For these situations, SVG has a few elements like <title> that will help you as an alternative.

If the amount of text that needs to be converted to outlines is very large, it becomes counterproductive as well. This is because the resulting export will be much heavier than if we were to reference the custom font, so it falls on the designer to find the right balance. Some editors will allow you to simplify those shapes without losing their form, by removing the unnecessary points and adjusting the bezier curves.
The way the editor outputs graphic exports
When we are done designing our assets and everything is ready to go, we have to export our assets to SVG. In doing so, you will see how there’s a lot of code that is added to our file that is not necessary at all. Your shape will be rendered in the same way without it.
Part of our workflow is to go through those exports and check that code. As stated earlier, avoiding redundancies will relieve us from troubleshooting unexpected behaviors, especially if there is more than one SVG file to be used.
There are plenty of tools and plugins out there that will automate this process for us. For example, SVGO Compressor is a SVGO-based plugin for Sketch that, among other features, will clean up the IDs in our file – by removing the unused ones and minifying the used ones – rounding values to 3 decimals, and removing the comments and description and other unnecessary code, and so forth. It runs in the background every time you export to SVG from Sketch and you can adjust the settings to make it work in the way you want.
Another recommended tool is SVGOMG, a free online tool that allows us to see the changes we make to our file in real time. This is particularly handy when we are working with complex graphics. It is also based on SVGO.
Conclusion
There are many ways to approach this process, it all depends on how are you going to use these assets. Remember that keeping fluid communication with developers ensures that the output you are producing is what is necessary, feasible and the most optimal way of implementing it.